Prerequisites
System requirement
Hardware
As OnSphere is a modular system which can grow from medium size to a very large system with millions of events, it’s not possible to give a minimal configuration. Minimal requirement is totally dependent of :
The number of events
The events conservation time
The number of services
The number of scripts
The usage of heavy services (like video)
The following description tries to give some advices to help dimensioning the system.
CPU usage is relatively low, but some services can require a lot of resources :
A large number of elements in the database (for searching / collecting)
The Kurento video application for stream encoding/decoding
The RAM used for a full stack amount to 16 GO, the most demanding service being the MongoDb with a very large collection of events.
The storage is used for :
Logging
Storing the alarms
Storing the configuration
Persisting the events
The network bandwidth depends on the number of services communicating between nodes and / or communicating with external resources. Beware of large burst of input data to avoid networking drop preventing OnSphere from consuming said data.
System
Every release goes through testing to ensure the system work as expected. Below is the list of systems that are included in automatic testing.
Note
It does not mean other configurations will not work, only that no testing has been done for it yet.
Docker version |
OS |
Support |
Min OSP version |
Max OSP version |
Portainer version (recommended) |
|---|---|---|---|---|---|
Version 23.0 |
Ubuntu 22.04 Jammy |
Full |
1.0 |
Latest |
2.19.0 |
Version 20.10 |
Ubuntu 20.04 Focal |
Full |
0.7 |
Latest |
2.19.0 |
Note
Most linux distributions are compatible with OnSphere but only Ubuntu server is currently part of our automatic testing.
External documentation
Docker
Install engine
The first step is to install (and start) Docker engine. See the official engine installation documentation for up-to-date information and complete installation process.
Post-installation steps
These steps are not mandatory but can improve your overall OnSphere experience.
Manage docker as non-root user
The member of the docker group can use the docker command without sudo.
The docker group should have been created but might contain no users yet, which is why you’re required to use sudo to run Docker commands.
Create the docker group if missing
$ sudo groupadd docker
Add your user to the group
$ sudo usermod -aG docker $USER
Log out and log back to refresh your group membership
Verify that you can run docker command
$ docker run hello-world
See the Official post-installation documentation for additional post installation steps.
Prepare the Swarm
About Swarm
Here is an extract from the official documentation.
Note
“What is a swarm?
The cluster management and orchestration features embedded in the Docker Engine are built using swarmkit. Swarmkit is a separate project which implements Docker’s orchestration layer and is used directly within Docker.
A swarm consists of multiple Docker hosts which run in swarm mode and act as managers (to manage membership and delegation) and workers (which run swarm services). A given Docker host can be a manager, a worker, or perform both roles. When you create a service, you define its optimal state (number of replicas, network and storage resources available to it, ports the service exposes to the outside world, and more). Docker works to maintain that desired state. For instance, if a worker node becomes unavailable, Docker schedules that node’s tasks on other nodes. A task is a running container which is part of a swarm service and managed by a swarm manager, as opposed to a standalone container.
One of the key advantages of swarm services over standalone containers is that you can modify a service’s configuration, including the networks and volumes it is connected to, without the need to manually restart the service. Docker will update the configuration, stop the service tasks with the out of date configuration, and create new ones matching the desired configuration.
When Docker is running in swarm mode, you can still run standalone containers on any of the Docker hosts participating in the swarm, as well as swarm services. A key difference between standalone containers and swarm services is that only swarm managers can manage a swarm, while standalone containers can be started on any daemon. Docker daemons can participate in a swarm as managers, workers, or both.
In the same way that you can use Docker Compose to define and run containers, you can define and run Swarm service stacks.
Keep reading for details about concepts relating to Docker swarm services, including nodes, services, tasks, and load balancing.”
Warning
OnSphere is currently not available on Kubernetes.
Deployment guide
See the official swarm installation documentation for up-to-date information and complete installation process.
Choose any master node and init the swarm
$ sudo docker swarm init
Swarm initialized: current node (dctvodm5y1kd35u259gtz6czx) is now a manager.

Run the following command to add a worker to this swarm :

    docker swarm join --token <generate-token> <ip>:2377

To add a manager to this swarm, run 'docker swarm join-token manager' and follow the instructions.
Add the other worker node
$ sudo docker swarm join --token <generate-token> <manager-ip>:2377
List the member of the swarm
$ sudo docker node ls
ID                            HOSTNAME    STATUS    AVAILABILITY   MANAGER STATUS   ENGINE VERSION
4e349v8oya7yoerqd9jh50sn4 *   manticore   Ready     Active         Leader           20.10.9
Warning
A host can be a member of ONE and only ONE swarm at the same time.
Deploy Portainer
About Portainer
Portainer is an application used to control the docker / orchestrator. In OnSphere’s case it is used to add a layer of security between the osp-configuration-dispatcher and the docker-engine as OnSphere needs access to the docker-engine Unix socket to automatically deploy/restart services.
Deploy Portainer
See the official portainer installation documentation for up-to-date information and complete installation process.
Download the YML manifest
$ curl -L https://downloads.portainer.io/ce2-19/portainer-agent-stack.yml -o portainer-agent-stack.yml
Deploy the stack
$ docker stack deploy -c portainer-agent-stack.yml portainer
Check if Portainer is running
$ docker ps
CONTAINER ID   IMAGE                           COMMAND                  CREATED              STATUS              PORTS                NAMES
59ee466f6b15   portainer/agent:latest          "./agent"                About a minute ago   Up About a minute                        portainer_agent.xbb8k6r7j1tk9gozjku7e43wr.5sa6b3e8cl6hyu0snlt387sgv
2db7dd4bfba0   portainer/portainer-ce:latest   "/portainer -H tcp:/…"   About a minute ago   Up About a minute   8000/tcp, 9443/tcp   portainer_portainer.1.gpuvu3pqmt1m19zxfo44v7izx
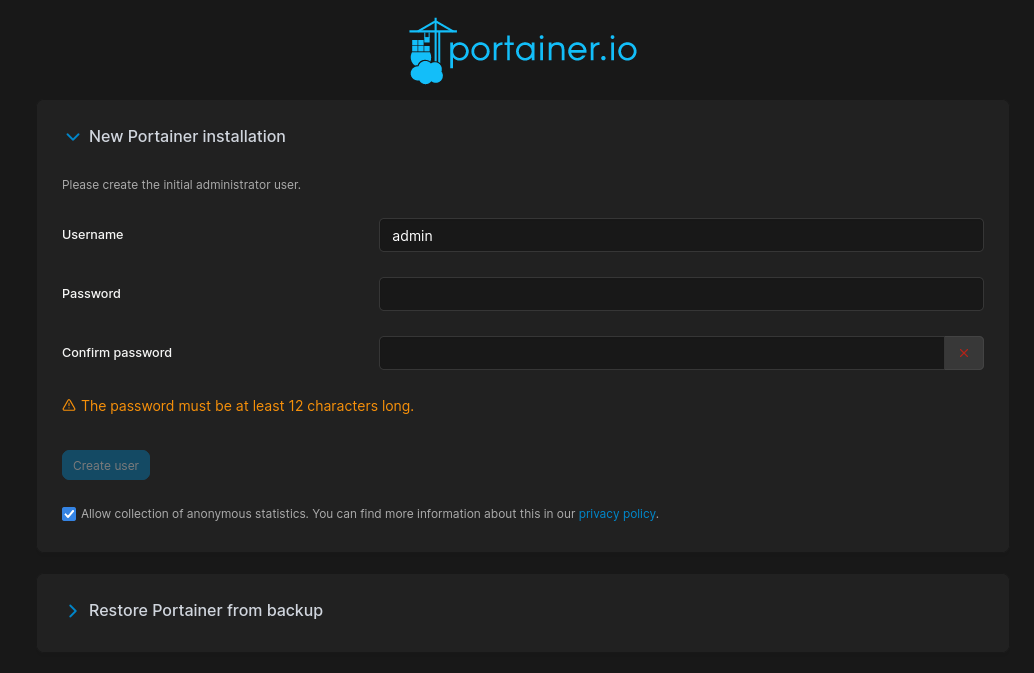
Open a web browser and go to
https://<swarm-ip>:9443
Configure the user account