System security
Swarm secrets is the main mechanism used for security at system level.
They are used for :
OnSphere communication bus (Each module has one certificate generated the fist time it (said module) is declared. The certificate is stored inside the SWARM secret store, and the public key is available inside the git configuration certs/ directory)
Mandatory accounts
It is important to know which secrets are used for mandatory accounts as well as which modules are using them and for what so that you can better decide if you want/need to rotate them :
Secret |
Used by |
Used for |
Rotating link |
|---|---|---|---|
osp-stack-1_admin-user |
osp-keycloak |
Super admin account (keycloak admin page) name |
|
osp-stack-1_admin-pwd |
osp-keycloak, osp-dispatcher and osp-mysql |
Super admin password, Account to clone the configuration can be used if Keycloak is corrupted and Mysql root password |
|
osp-stack-1_database_password |
osp-keycloak and osp-mysql |
Password for Mysql access and Mysql user password |
Rotating swarm secrets
Standard method
Rotating one of the mandatory account secrets usually requires extra steps but otherwise, here’s the standard method:
Create a duplicate of the secret
Assign the duplicate to all the service with usage of the given secret and restart them
Remove the first secret (read the error message, if the system refuses the removal it’s probably because the secret is still used)
Create a new secret with your strong password
Assign the new secret to the previous service
Remove the duplicated secret.
Mandatory account secrets
Rotate admin user
This process is currently not permitted by the system, if this feature is needed by your company feel free to contact us at info@swissdotnet.ch.
Rotate admin password
1 : Update on Keycloak
Log-in the
Keycloakadministration page (by default auth/admin)Go to user and reset the password
Log-in with admin password
On managing account
On signing in
Set a new password and apply
2 : Modify the osp-mysql root account
Log-in the mysql docker (from portainer or command line)
Log on mysql
mysql -u root -p
Use the old root password
Execute the update password
SET PASSWORD FOR 'root'@'localhost' = 'password'
3 : Apply the standard method for rotating the swarm secret named admin-pwd
Rotate database password
1 : Modify the keycloak mysql account
Log-in the mysql docker (from portainer or command line)
Log on mysql
mysql -u root -p
Use the root password
Execute the update password
SET PASSWORD FOR 'keycloak' = 'password'
2 : Apply the standard method for rotating the swarm secret named database_password
Warning
The secret
database_passwordmust be changed for the mysql service and keycloak service.
Lock your swarm
Swarm has critical configuration information inside the Raft log which is encrypted on the disk by default with a TLS key (the same one used for node communication).
This key is not protected on the host but, Swarm gives you the possibility to lock this key with a password which is regularly rotated by the system.
The main drawback is that a node will not be able to reconnect to the swarm after a restart without a manual unlocking of this key.
See the docker swarm documentation for more detailed information.
Encrypt in-between node traffic
The traffic between the node is not encrypted by default, it’s possible to add encryption to this traffic on all the swarm overlay network. This is done by passing the driver_opts encrypted : “” at the creation.
networks:
  my-app-backend:
    driver: overlay
    driver_opts:
      encrypted: ""
To migrate an existing stack, the recommended way is :
Update the stack.cfg and create a duplicated version of all the overlay network with the encrypted option
For each module replace the network by the encrypted version
Delete the not encrypted network
[Opt] Re-duplicated with the original name (then point)
See the docker network documentation for more detailed information.
Configure same user as OnSphere to access Portainer
Keylcoak can be used to provide the Portainer user. The following steps are necessary:
Add or create a client to Keycloak. If the address of the stack is a hostname, Portainer must be able to resolve it.
{
    "clientId": "portainer-auth",
    "name": "Portainer",
    "rootUrl": "http://<portainer hostname>:<portainer port>",
    "adminUrl": "http://<portainer hostname>:<portainer port>",
    "surrogateAuthRequired": false,
    "enabled": true,
    "alwaysDisplayInConsole": false,
    "clientAuthenticatorType": "client-secret",
    "secret": "7eefc9f8-9ccf-49dc-a8f9-30a5ee53960c",
    "redirectUris": ["http://<portainer hostname>:<portainer port>/*"],
    "webOrigins": ["http://<portainer hostname>:<portainer port>"],
    "notBefore": 0,
    "bearerOnly": false,
    "consentRequired": false,
    "standardFlowEnabled": true,
    "implicitFlowEnabled": false,
    "directAccessGrantsEnabled": true,
    "serviceAccountsEnabled": false,
    "publicClient": false,
    "frontchannelLogout": false,
    "protocol": "openid-connect",
    "attributes": {
        "saml.assertion.signature": "false",
        "saml.force.post.binding": "false",
        "saml.multivalued.roles": "false",
        "saml.encrypt": "false",
        "oauth2.device.authorization.grant.enabled": "false",
        "backchannel.logout.revoke.offline.tokens": "false",
        "saml.server.signature": "false",
        "saml.server.signature.keyinfo.ext": "false",
        "use.refresh.tokens": "true",
        "exclude.session.state.from.auth.response": "false",
        "oidc.ciba.grant.enabled": "false",
        "saml.artifact.binding": "false",
        "backchannel.logout.session.required": "true",
        "client_credentials.use_refresh_token": "false",
        "saml_force_name_id_format": "false",
        "saml.client.signature": "false",
        "tls.client.certificate.bound.access.tokens": "false",
        "saml.authnstatement": "false",
        "display.on.consent.screen": "false",
        "saml.onetimeuse.condition": "false"
    },
    "authenticationFlowBindingOverrides": {},
    "fullScopeAllowed": true,
    "nodeReRegistrationTimeout": -1,
    "defaultClientScopes": ["web-origins", "profile", "roles", "email"],
    "optionalClientScopes": [
        "address",
        "phone",
        "offline_access",
        "microprofile-jwt"
    ]
}
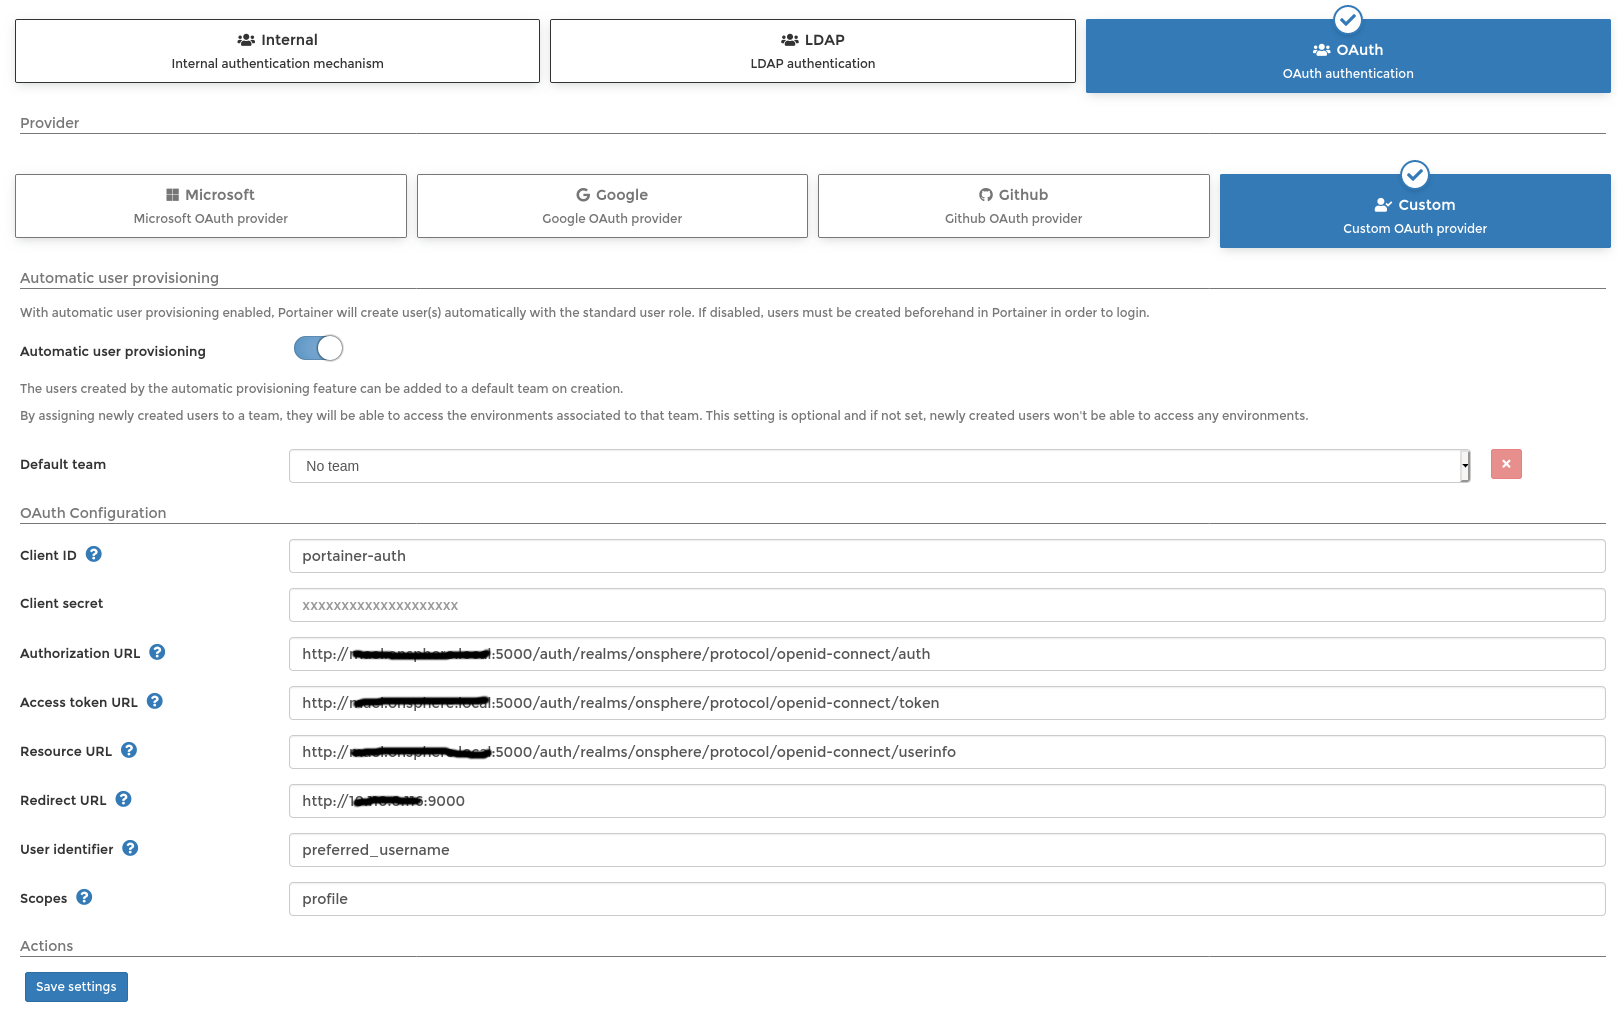
Create the configuration inside Portainer. Self-signed certificate are not supported.
Manage the right with Portainer for each user.