Display alarm points on map
Prerequisites
Modules
External
A MapBox account see https://docs.mapbox.com/help/tutorials/get-started-tokens-api/
Checkout branches
git checkout origin/osp-maps-configuration .
git checkout origin/osp-alarms-web-configuration .
git checkout origin/osp-variables-configuration .
git checkout origin/osp-scripts-configuration .
Note
The complete example can be checkout from any OnSphere stack
git checkout origin/example-maps-display-alarms .
Objectives
How to configure values linked to
geo.mapsfile.How to configure a complete layer (the three files
layers.web,layers.mapsandlayers.ospp).How to display on a dashboard using the map widget.
Description
The Maps module is able to let users display GeoJson information on a map. Those geometry are declared inside a geo.maps file. Once the geometry is declared it will be assigned to every values under it until another geo.maps file is found. To display those geometrical information you will need to declare 3 files :
layers.weblayers.mapslayers.ospp
The layers.ospp file is the one that interests us the most. Inside it you will declare the type of layer you want. Its content will be similar to something like this :
{
    "name": "Alarm layer",
    "description": "",
    "content": {
        "valueType": "POINT",
        "contentType": "SEVERITY",
        "severityConfigurations": [
            {
                "severity": "root.site.gibloux.alarms.highest_severity",
                "count": "root.site.gibloux.alarms.count",
                "dashboard": "root.alarmGenerator"
            },
            {
                "severity": "root.site.moleson.alarms.highest_severity",
                "count": "root.site.moleson.alarms.count",
                "dashboard": "root.alarmGenerator"
            }
        ]
    }
}
Configuration structure
![@startuml
skinparam backgroundColor transparent
package "modules" as modules {
node ospweb as "osp-web"
node ospmaps as "osp-maps"
}
package "root" as root {
[dashboard.view] as dashboardview
package "layers" as mapLayers {
package "alarms" as alarmsLayer{
[layer.ospp] as layerospp
[layer.maps]
[layer.web]
}
}
package "site" as site {
package "lausanne" as lausanne {
package "alarms" as lausanneAlarms {
[filters] as lausanneFilters
[highestSeverityValue] as highLausanne
[countValue] as countLausanne
}
[geo.maps] as lausanneGeoMaps
}
package "bulle" as bulle {
package "alarms" as bulleAlarms {
[filters] as bulleFilters
[highestSeverityValue] as highBulle
[countValue] as countBulle
}
[geo.maps] as bulleGeoMaps
}
}
}
ospmaps -[#black]-> bulleGeoMaps : **Own**
ospmaps -[#black]-> lausanneGeoMaps : **Own**
lausanneGeoMaps -[#black]-> highLausanne: **linked**
lausanneGeoMaps -[#black]-> countLausanne: **linked**
bulleGeoMaps -[#black]-> highBulle: **linked**
bulleGeoMaps -[#black]-> countBulle: **linked**
ospweb -[#black]-> dashboardview : **Own**
dashboardview -[#black]-> alarmsLayer : **Display in widget**
layerospp -[#black]u-> highLausanne : **Configured to be displayed**
layerospp -[#black]u-> countLausanne : **Configured to be displayed**
layerospp -[#black]u-> highBulle : **Configured to be displayed**
layerospp -[#black]u-> countBulle : **Configured to be displayed**
@enduml](../../_images/plantuml-d5a0c8312b12049465825f978ddc0e4acf30735a.png)
Steps
Warning
In the following example there is a token from MapBox you have to change. This token can be created following this link (you need an MapBox account) MapBox token API . See osp-maps for more information.
1. Create the dashboard
The dashboard is the graphic frontend used to visualize the map
root/dashboard.view
{
  "configuration": [
    {
      "id": "Lo-_-jGf",
      "type": "Maps",
      "title": "",
      "mapsWidgetSettings": {
        "layerOptions": [
          {
            "layerId": "root.layers.alarms",
            "activatedByDefault": true
          }
        ],
        "mapStyle": {
          "dark": "mapbox://styles/mapbox/dark-v11",
          "light": "mapbox://styles/mapbox/light-v11"
        },
        "centerPosition": [
          7.153656,
          46.80603
        ],
        "zoomLevel": 9
      }
    }
  ],
  "layout": {
    "lg": [
      {
        "w": 12,
        "h": 6,
        "x": 0,
        "y": 0,
        "i": "Lo-_-jGf"
      }
    ]
  },
  "breakpoints": {
    "lg": 1200,
    "md": 996,
    "sm": 768,
    "xs": 480,
    "xxs": 0
  },
  "cols": {
    "lg": 12,
    "md": 10,
    "sm": 6,
    "xs": 4,
    "xxs": 2
  },
  "rowHeight": 150
}
root/dashboard.web
{
    "moduleId": "modules.web.web-1",
    "title": "Home",
    "description": "OnSphere home",
    "tags": []
}
2. Create the different sites with their alarms and their geo.maps file
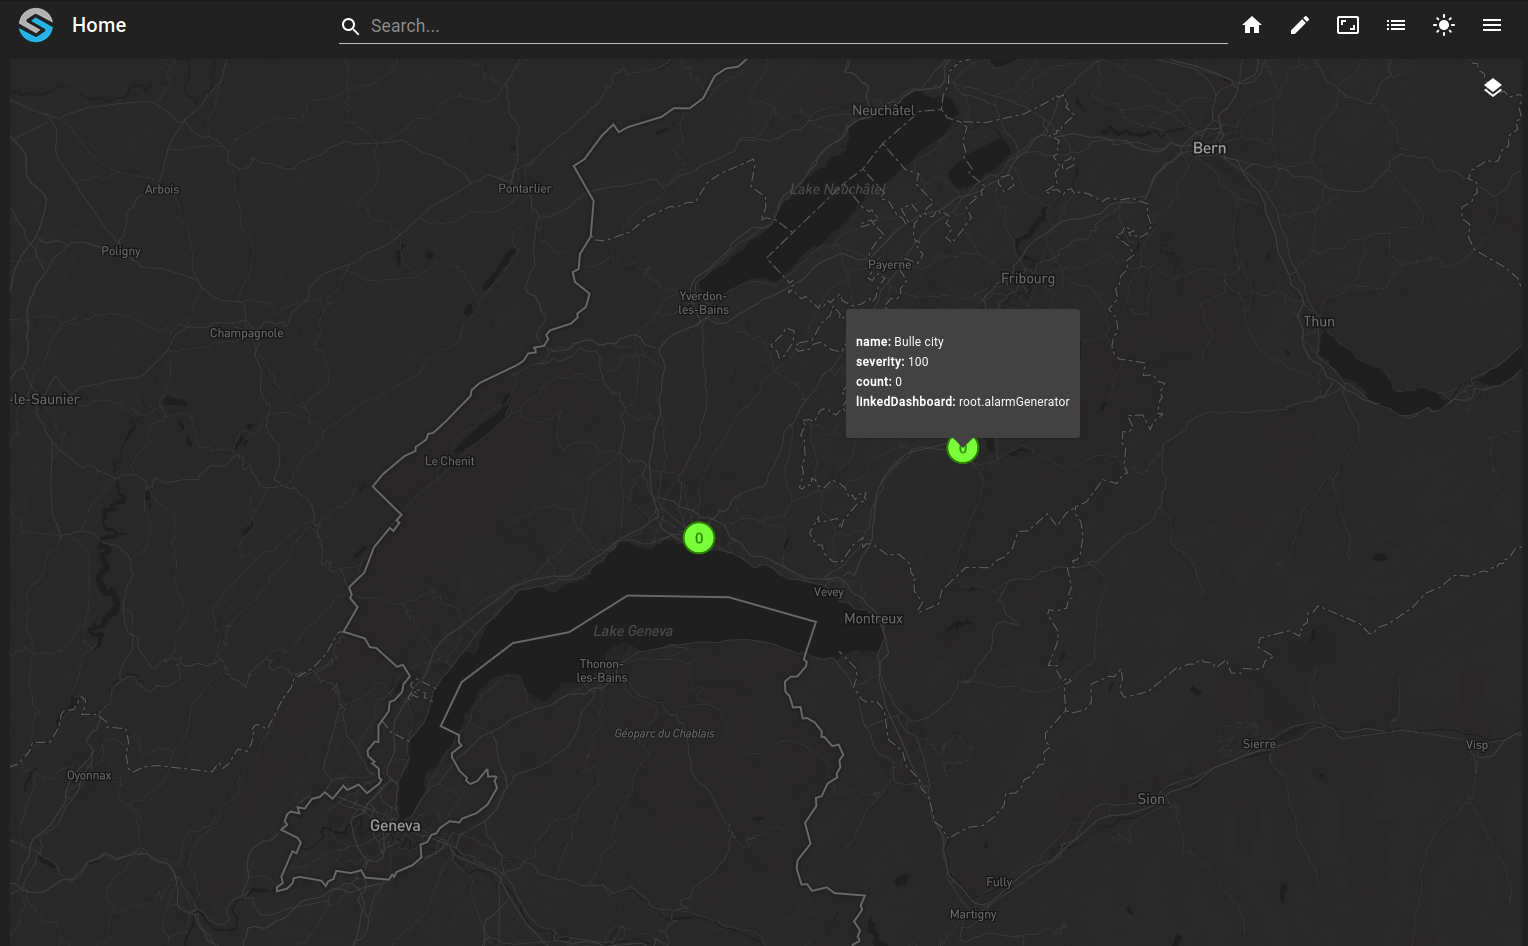
root/site/bulle/geo.maps
{
    "geoJsonString": {
        "type": "Feature",
        "geometry": {
          "type": "Point",
          "coordinates": [7.0567, 46.6195, 450]
        },
        "properties": {
          "name": "Bulle city"
        }
      },

    "moduleId": "modules.maps.maps-1"
}
root/site/lausanne/geo.maps
{
    "geoJsonString": {
        "type": "Feature",
        "geometry": {
          "type": "Point",
          "coordinates": [6.633597, 46.519962, 250]
        },
        "properties": {
          "name": "Lausanne"
        }
      },

    "moduleId": "modules.maps.maps-1"
}
Note
To create the complete alarms suite you can refer to the alarm module and alarm examples. But note that the two sites have some values already configured.
root/site/bulle/alarms/count/owner.alarms
{
    "filterId": "root.site.bulle.alarms",
    "type": "ALARM_COUNT"
}
root/site/bulle/alarms/highest_severity/owner.alarms
{
    "filterId": "root.site.bulle.alarms",
    "type": "MAX_SEVERITY"
}
root/site/lausanne/alarms/count/owner.alarms
{
    "filterId": "root.site.lausanne.alarms",
    "type": "ALARM_COUNT"
}
root/site/lausanne/alarms/highest_severity/owner.alarms
{
    "filterId": "root.site.lausanne.alarms",
    "type": "MAX_SEVERITY"
}
3. Configure the layer
root/layers/alarms/layer.maps
{
    "moduleId": "modules.maps.maps-1"
}
root/layers/alarms/layer.ospp
Note
In this example we point our clicks to a root.alarmGenerator dashboard that let’s you test alarms displayed on the map by generating or changing some. It is optional.
{
    "name": "Alarm layer",
    "description": "",
    "content": {
        "valueType": "POINT",
        "layerType": "SEVERITY",
        "severityConfigurations": [
            {
                "severity": "root.site.bulle.alarms.highest_severity",
                "count": "root.site.bulle.alarms.count",
                "dashboard": "root.alarmGenerator"
            },
            {
                "severity": "root.site.lausanne.alarms.highest_severity",
                "count": "root.site.lausanne.alarms.count",
                "dashboard": "root.alarmGenerator"
            }
        ]
    }
}
root/layers/alarms/layer.web
{
    "moduleId": "modules.web.web-1"
}
4. Result of the example