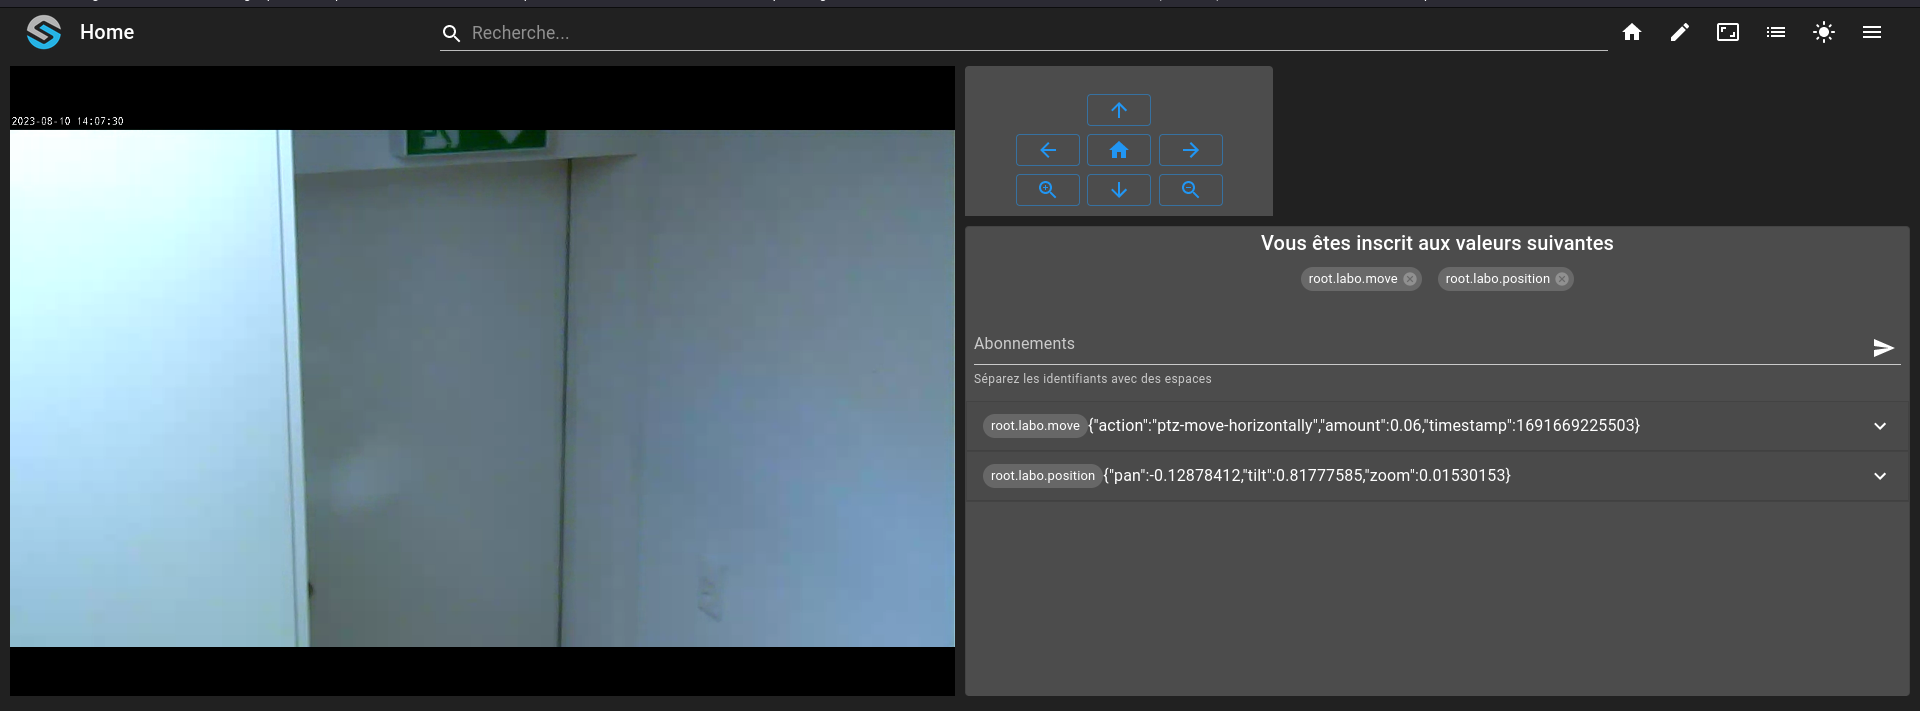
Control a camera with PTZ
Prerequisites
Modules
External Ressource
An RTSP video camera of flux
An Onvif PTZ compatible camera
Checkout branches
git checkout origin/osp-web-configuration .
git checkout origin/osp-video-configuration .
git checkout origin/osp-variables-configuration .
git checkout origin/osp-onvif-configuration .
Description
In this tutorial you will learn how to move a camera from the front-end.
Steps
1. Create a video stream
root/video/server-1/owner-server.video
{
    "moduleId": "modules.video.video-1",
    "url": "ws://kurento:8888/kurento",
    "turnServers": []
}
root/video/server-1/value.ospp
{
    "name" : "Default kurento server",
    "description" : "The video server for streaming video",
    "type" : "BOOLEAN"
}
2. Create an Onvif camera
root/labo/camera.onvif
{
    "username": "user",
    "hostname": "http://camera.example.org",
    "moduleId": "modules.onvif.onvif-1",
    "profileToken": "quality_h264",
    "passwordProvider": {
        "type": "PLAINTEXT",
        "password": "password"
    }
}
root/labo/value.ospp
{
    "name" : "Labo camera",
    "description" : "",
    "type" : "TEXT"
}
3. (Optional) Create a value to display the current position
root/labo/position/owner-camera.onvif
{
    "linkedCamera": "root.labo",
    "dataType": "PTZ"
}
root/labo/position/value.ospp
{
    "name" : "Ptz",
    "description" : "",
    "type" : "TEXT"
}
1. Create an URL to access the camera
root/labo/url/owner.video
{
  "networkBufferingTime": {
    "value": 1,
    "unit": "SECONDS"
  },
  "disableStreamEncoding": true,
  "streamType": "STREAM",
  "serverId": "root.video.server-1",
  "urls": [
    "rtsp://user:password@camera.example.org/axis-media/media.amp?profile=quality_h264&sessiontimeout=60&streamtype=unicast"
  ]
}
root/labo/url/value.ospp
{
    "name" : "Labo camera",
    "description" : "The camera in the labo",
    "type" : "BOOLEAN"
}
5. Create a value to move the camera
root/labo/move/callback.ospp
{
    "linkedOutputs": [
        {
            "outputId": "root.labo"
        }
    ]
}
root/labo/move/owner.variables
{
  "moduleId": "modules.variables.variables-1"
}
root/labo/move/value.ospp
{
    "name" : "Move camera",
    "description" : "",
    "type" : "TEXT"
}
6. Create the dashboard to visualize the video stream
root/dashboard.view
{
    "configuration": [
        {
            "type": "VideoPlayer",
            "id": "EiVC9TjQ",
            "title": "",
            "videoWidgetSettings": {
                "videoId": "root.labo.url"
            }
        },
        {
            "type": "PtzController",
            "id": "cXZ46At7",
            "title": "test ptz",
            "valueSubscriptions": {
                "values": [
                    {
                        "id": "root.labo.move",
                        "type": "TEXT",
                        "right": "WRITE"
                    }
                ]
            },
            "ptzControllerWidgetSettings": {
                "distanceByClick": 0.02,
                "zoomMinValue": 0,
                "zoomMaxValue": 100,
                "panMinValue": -100,
                "panMaxValue": 100,
                "tiltMinValue": 0,
                "tiltMaxValue": 100
            }
        },
        {
            "valueSubscriptions": {
                "values": [
                    {
                        "id": "root.labo.move",
                        "type": "TEXT",
                        "right": "READ"
                    },
                    {
                        "id": "root.labo.position",
                        "type": "TEXT",
                        "right": "READ"
                    }
                ]
            },
            "id": "86H6L3pw",
            "type": "ValueSubscription",
            "title": ""
        }
    ],
    "layout": {
        "lg": [
            {
                "w": 6,
                "h": 4,
                "x": 0,
                "y": 0,
                "i": "EiVC9TjQ"
            },
            {
                "w": 2,
                "h": 1,
                "x": 6,
                "y": 0,
                "i": "cXZ46At7"
            },
            {
                "w": 6,
                "h": 3,
                "x": 6,
                "y": 1,
                "i": "86H6L3pw"
            }
        ]
    },
    "breakpoints": {
        "lg": 1200,
        "md": 996,
        "sm": 768,
        "xs": 480,
        "xxs": 0
    },
    "cols": {
        "lg": 12,
        "md": 10,
        "sm": 6,
        "xs": 4,
        "xxs": 2
    },
    "rowHeight": 150
}
root/dashboard.web
{
    "moduleId": "modules.web.web-1",
    "title": "Home",
    "description": "OnSphere home",
    "tags": []
}
7. The dashboard
