Item Render usage
Prerequisites
Modules
git checkout origin/osp-web-configuration .
Vscode extension
Example configuration
git checkout origin/example-template-playbook-item-render .
Description
This example show how to generate Items based on an Inventory. This example is a very common usage of template playbooks. After playbooks execution, two dashboard will be generated and filled with the name given in the inventory.
Example
1. Create a Inventory
source;destination;rule;variable-dashboardName
templates.sources.example-1;root.fribourg;;Fribourg
templates.sources.example-1;root.lausanne;;Lausanne
Or in a more user-friendly view with a CSV reader plugin :
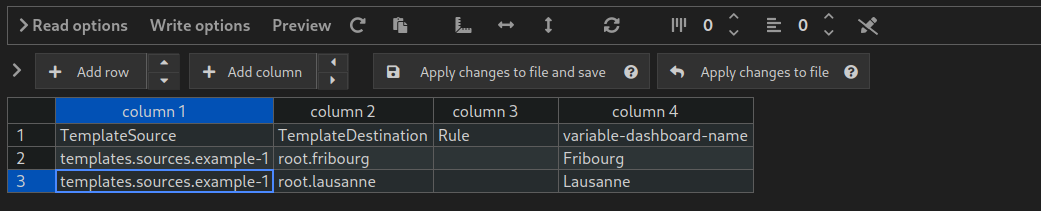
This file will define from where the file will be copied
sourcetodestination.Rule’s column is empty because there is no rule used.
A variable named
dashboardNamewho define two sites :FribourgandLausanne.
2. Define a playbook
This playbook define one generation target of type ItemsRender who take the source definition from inventory templates/inventory/data.csv
[
    {
        "type": "ItemsRender",
        "source": "templates/inventory/data.csv",
        "fileRenderContext": {}
    }
]
3. Create the default dashboard
The file use a variable named dashboardName who is defined inside the data.csv file, this variable will be used for each copy.
{
  "configuration": [
    {
      "type": "Text",
      "id": "bM8TpZoD",
      "title": "${dashboardName}",
      "textWidgetSettings": {
        "text": "${dashboardName}"
      }
    }
  ],
  "layout": {
    "lg": [
      {
        "w": 6,
        "h": 1,
        "x": 0,
        "y": 0,
        "i": "bM8TpZoD"
      }
    ]
  },
  "breakpoints": {
    "lg": 1200,
    "md": 996,
    "sm": 768,
    "xs": 480,
    "xxs": 0
  },
  "cols": {
    "lg": 12,
    "md": 10,
    "sm": 6,
    "xs": 4,
    "xxs": 2
  },
  "rowHeight": 150
}
This file will be copied with the templateVariables into the destination path.
{
    "moduleId": "modules.web.web-1",
    "title": "${dashboardName}",
    "description": "Tutorial template playbook",
    "tags": ["Tutorial"]
}
4. Execute the playbook
Generate the playbook template with one of the given command :
Playbook template [execute a unique target] and select the
example.playbookthen press enter.
5. See the files generated
The file now contain a variables named dashboardName with Fribourg or Lausanne as value.
6. Push the configuration
Warning
Always use the command [execute-all] before pushing to be sure that there is no file auto-generated who are not used anymore (example a csv line is deleted).
git add .
git commit -m "Add two example dashboard"
git push
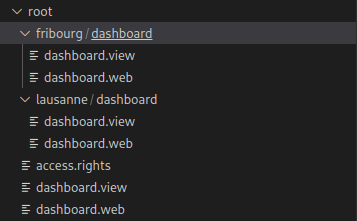
7. Visualize the result
There is two dashboards one for each line of csv file :
