Visualize reports

Prerequisites

Modules

Checkout branches

git checkout origin/osp-alarms-web-configuration .
git checkout origin/osp-reports-configuration .

Description

This example shows how to visualize existing reports on a dashboard.

If you don’t have reports generated yet, you should follow this example before going through this one.

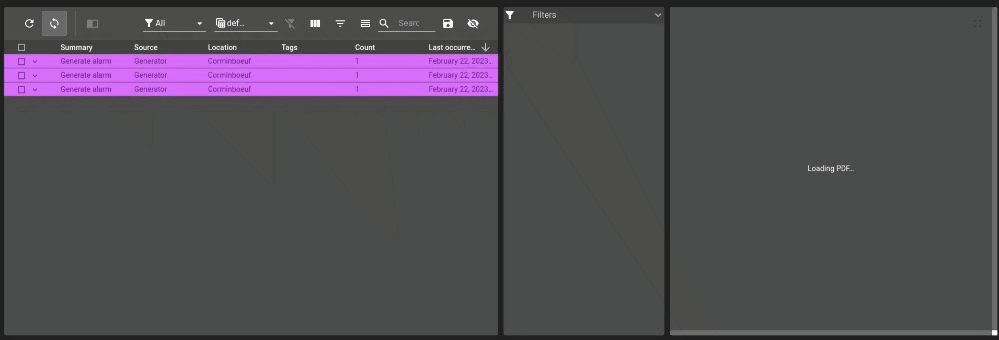
In this example we will create a dashboard with a ReportList and a PDFViewer. The ReportList widget displays the list of all generated reports and the PDFViewer loads and displays a report upon clicking in one of the reports present in the ReportList.

We will also use a menu to allow the download of a report directly from the reports list.

Steps

1. Create a menu for the ReportList

This menu has two actions:

  • download: using this action, we can request a download of the selected report

  • open: opens the report in a new tab instead of directly downloading it

For the download action we need to set it twice, once for the CSV reports and once for the PDF ones. The reason is that we set a different content depending on the type of reports. You can find more details about this in the module documentation.

root/reports/osp/menus/menu.web

{
    "moduleId": [
      "modules.web.web-1"
    ],
    "name": "Reports menu",
    "description": "All standard reports operations",
    "menus": [
      {
        "label": "Download",
        "icon": "file_download",
        "context": [
          {
            "type": "ReportsList",
            "action": "root.reports.osp.actions.download",
            "condition": "${reports.selected}.length === 0 && ${reports.clicked.templateFormat} !== 'pdf'",
            "input": {
              "documentId": {
                "extract": "reports.clicked.documentId",
                "as": "string"
              }
            },
            "output": [
              {
                "operation": "download",
                "input": {
                  "content": {
                    "extract": "result.content.parsed",
                    "as": "string"
                  },
                  "format": {
                    "extract": "result.content.format",
                    "as": "string"
                  },
                  "filename": {
                    "extract": "result.content.name",
                    "as": "string"
                  }
                }
              }
            ]
          }
        ]
      },
      {
        "label": "Download",
        "icon": "file_download",
        "context": [
          {
            "type": "ReportsList",
            "action": "root.reports.osp.actions.download",
            "condition": "${reports.selected}.length === 0 && ${reports.clicked.templateFormat} === 'pdf'",
            "input": {
              "documentId": {
                "extract": "reports.clicked.documentId",
                "as": "string"
              }
            },
            "output": [
              {
                "operation": "download",
                "input": {
                  "content": {
                    "extract": "result.content.report",
                    "as": "string"
                  },
                  "format": {
                    "extract": "result.content.format",
                    "as": "string"
                  },
                  "filename": {
                    "extract": "result.content.name",
                    "as": "string"
                  }
                }
              }
            ]
          }
        ]
      },
      {
        "label": "Open",
        "icon": "open_in_new",
        "context": [
          {
            "type": "ReportsList",
            "action": "root.reports.osp.actions.download",
            "condition": "${reports.selected}.length === 0 && ${reports.clicked.templateFormat} === 'pdf'",
            "input": {
              "documentId": {
                "extract": "reports.clicked.documentId",
                "as": "string"
              }
            },
            "output": [
              {
                "operation": "open",
                "input": {
                  "content": {
                    "extract": "result.content.report",
                    "as": "string"
                  },
                  "format": {
                    "extract": "result.content.format",
                    "as": "string"
                  },
                  "filename": {
                    "extract": "result.content.name",
                    "as": "string"
                  }
                }
              }
            ]
          }
        ]
      }
    ]
  }
  

2. Add a ReportList and PDFViewer inside a dashboard

We can now create a ReportList with default settings and add to it the created menu. Alongside the list, we add a PDFViewer, also with default settings.

We took the alarm table defined in this other example to generate new reports and see the reports list actualize.

root/dashboards/reports-viewer/dashboard.view

{
  "configuration": [
    {
      "type": "AlarmTable",
      "id": "aQEoDuEk",
      "title": "",
      "options": {
        "userPreference": "LOCAL_STORAGE"
      },
      "menuReferences": [
        "root.alarms.menus.reports"
      ],
      "maxMenuHeight": 300,
      "alarmWidgetSettings": {
        "defaultFilter": "root.alarms.filters.all",
        "defaultView": "root.alarms.views.default",
        "resizeMode": "nextColumn",
        "disableFilterUpdate": false,
        "disableToolbar": false,
        "enableAutomaticRefresh": true,
        "disableToolbarTableRefresh": false,
        "disableToolbarTableAutoRefresh": false,
        "disableToolbarJournal": false,
        "disableToolbarColumnShowHide": false,
        "disableToolbarFilterShowHide": false,
        "disableToolbarSummaryShowHide": false,
        "disableToolbarSearch": false,
        "disableToolbarColumnChooser": false,
        "disableToolbarClearFilter": false
      }
    },
    {
      "type": "ReportsList",
      "id": "hrrT9pGM",
      "title": "",
      "menuReferences": [
        "root.reports.osp.menus"
      ],
      "reportsListWidgetSettings": {
        "templateSelect": {
          "type": "ReportsTemplate",
          "multiple": true,
          "limitTags": 1,
          "icon": "picture_as_pdf"
        }
      }
    },
    {
      "type": "PdfViewer",
      "id": "hrrT3JoM",
      "title": "",
      "pdfViewerWidgetSettings": {
        "content": "",
        "display": "one"
      }
    }
  ],
  "layout": {
    "lg": [
      {
        "w": 6,
        "h": 4,
        "x": 0,
        "y": 0,
        "i": "aQEoDuEk"
      },
      {
        "w": 2,
        "h": 4,
        "x": 6,
        "y": 0,
        "i": "hrrT9pGM"
      },
      {
        "w": 4,
        "h": 4,
        "x": 8,
        "y": 0,
        "i": "hrrT3JoM"
      }
    ]
  },
  "breakpoints": {
    "lg": 1200,
    "md": 996,
    "sm": 768,
    "xs": 480,
    "xxs": 0
  },
  "cols": {
    "lg": 12,
    "md": 10,
    "sm": 6,
    "xs": 4,
    "xxs": 2
  },
  "rowHeight": 150
}

3. Generate reports and visualize them on the PDFViewer

Once a report is generated, the ReportList widget is automatically updated. Upon choosing a report, the PDFViewer will load it.

../../_images/example-reports-visualize.gif

Add this example in your configuration

You can directly use the following command to add this example into your configuration :

git checkout origin/example-dashboard-reports-viewer .