List and update a collection
Prerequisites
Modules
git checkout origin/osp-web-configuration .
git checkout origin/osp-collections-configuration .
Description
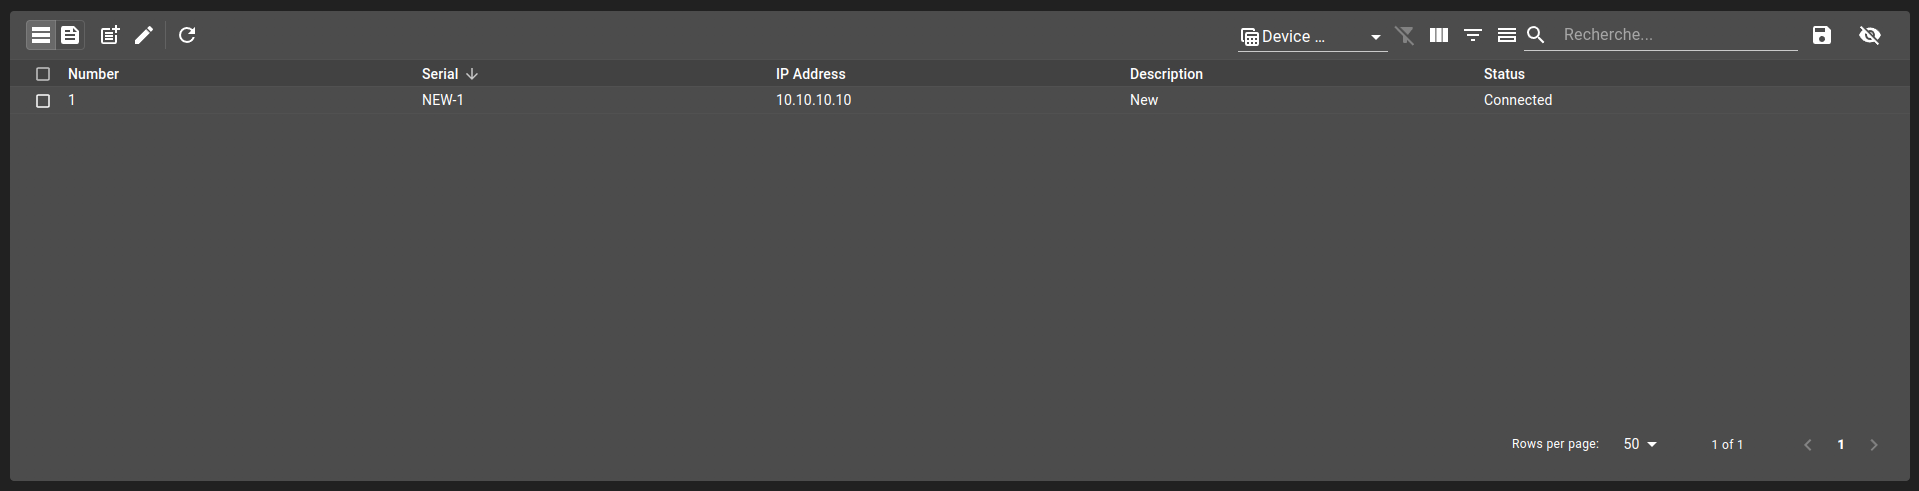
This tutorial shows how to create a Collection table to list and update the elements of a collection.
Steps
1. Create the collection
This tutorial uses the collection from this example as a base. Follow the tutorial to create the collection before doing the rest of this tutorial.
2. Define a view for the collection schema
Before setting a dashboard, we need to add at least one view to the collection. A Collection table can only interact with collections that have at least one view, as the view defines what columns the table must display.
Create a schema.web file next to the schema.ospp and define one view with the followings columns:
Number
Serial
Ip address
Description
Status
root/collections/device/schema.web
Your file should look like this:
{
    "moduleId": "modules.web.web-1",
    "name": "IP Devices",
    "displayedProperty": "serial",
    "views": [
        {
            "id": "1",
            "name": "Default",
            "reorderable": true,
            "sort": [
                {
                    "field": "serial",
                    "direction": "desc"
                }
            ],
            "columns": [
                {
                    "name": "Number",
                    "field": "no",
                    "position": 0
                },
                {
                    "name": "Serial",
                    "field": "serial",
                    "position": 1
                },
                {
                    "name": "IP Address",
                    "field": "ip_address",
                    "position": 2
                },
                {
                    "name": "Description",
                    "field": "description",
                    "position": 3
                },
                {
                    "name": "Status",
                    "field": "status",
                    "position": 4
                }
            ]
        }
    ]
}
3. Create a dashboard with a CollectionTable
Create a dashboard and add a CollectionTable inside. You can set the default schema as root.collections.device and the default filter as filter_status_connected.
Your dashboard should look like this:
root/collections/device/dashboard/dashboard.view
{
  "configuration": [
    {
      "type": "CollectionTable",
      "id": "D2H2STZ3",
      "title": "",
      "collectionTableWidgetSettings": {
        "defaultSchema": "root.collections.device",
        "defaultFilter": "filter_status_connected",
        "pageSize": 50,
        "pageSizes": [
          50,
          100,
          200
        ],
        "resizeMode": "widget",
        "disableToolbarTableRefresh": false,
        "disableSchemaUpdate": false,
        "disableViewUpdate": false,
        "disableFilterUpdate": false,
        "disableToolbar": false,
        "disableToolbarMenu": false,
        "disableSidePanel": false,
        "disableToolbarExport": false,
        "disableToolbarColumnShowHide": false,
        "disableToolbarFilterShowHide": false,
        "disableToolbarSummaryShowHide": false,
        "disableToolbarSearch": false,
        "disableToolbarColumnChooser": false,
        "disableToolbarClearFilter": false
      }
    }
  ],
  "layout": {
    "lg": [
      {
        "w": 12,
        "h": 7,
        "x": 0,
        "y": 0,
        "i": "D2H2STZ3"
      }
    ]
  },
  "breakpoints": {
    "lg": 1200,
    "md": 996,
    "sm": 768,
    "xs": 480,
    "xxs": 0
  },
  "cols": {
    "lg": 12,
    "md": 10,
    "sm": 6,
    "xs": 4,
    "xxs": 2
  },
  "rowHeight": 150
}
root/collections/device/dashboard/dashboard.web
{
    "moduleId": "modules.web.web-1",
    "title": "Collections - IP Devices",
    "description": "",
    "tags": ["Collections"]
}
4. Push the configuration to the osp-configuration-dispatcher
git add .
git commit -m "Add new dashboard"
git pull
git push
5. Login to OnSphere and open the dashboard
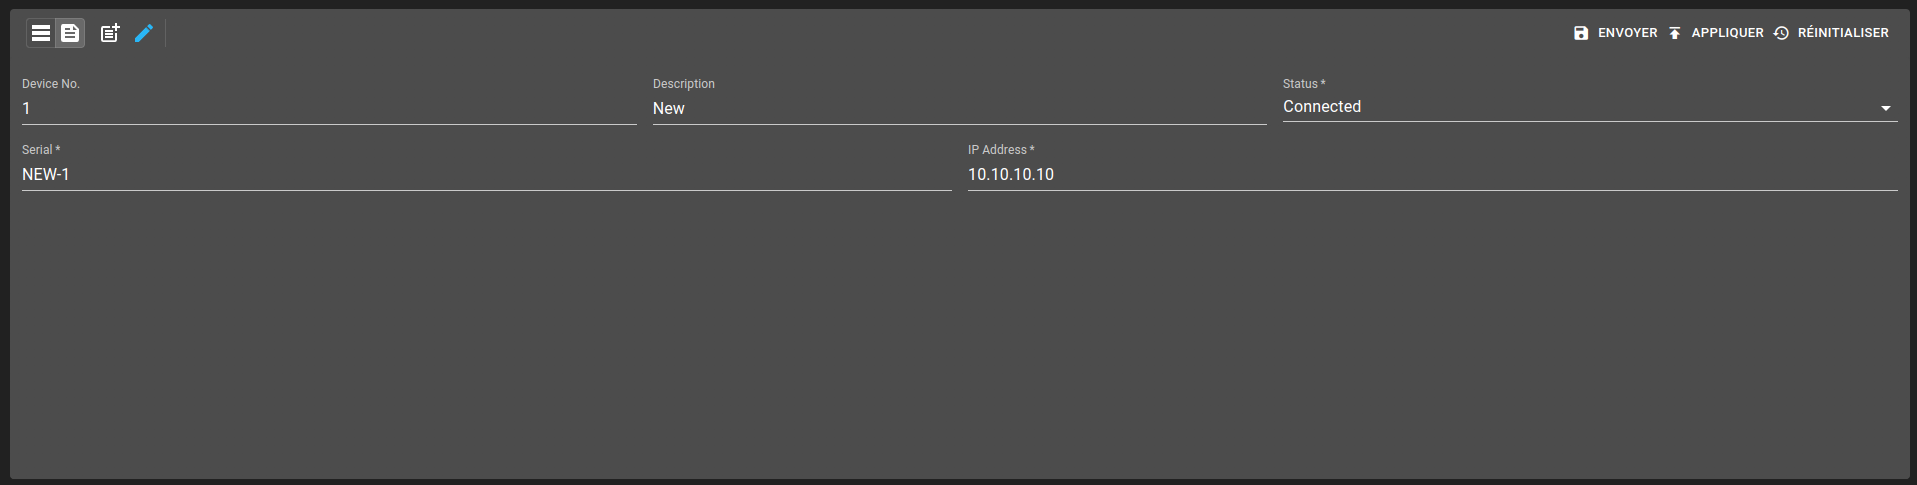
6. Add a Form to insert/edit an element
To be able to write into the collection, we will create a new Form linked to our schema.
root/collections/device/form/form.web
{
  "moduleId": [
    "modules.web.web-1"
  ],
  "name": "IP Devices",
  "description": "",
  "bindings": {},
  "rights": [],
  "schema": "root.collections.device",
  "ui": {
    "type": "VerticalLayout",
    "elements": [
      {
        "type": "HorizontalLayout",
        "elements": [
          {
            "type": "Control",
            "scope": "#/properties/no",
            "label": "Device No."
          },
          {
            "type": "Control",
            "scope": "#/properties/description",
            "label": "Description"
          },
          {
            "type": "Control",
            "scope": "#/properties/status",
            "label": "Status"
          }
        ]
      },
      {
        "type": "HorizontalLayout",
        "elements": [
          {
            "type": "Control",
            "scope": "#/properties/serial",
            "label": "Serial"
          },
          {
            "type": "Control",
            "scope": "#/properties/ip_address",
            "label": "IP Address"
          }
        ]
      }
    ]
  },
  "initialValue": {
    "status": "Connected"
  },
  "submit": {
    "destination": "Request",
    "type": "Deferred"
  }
}
7. Change the table mode to enter Form and create/update an element
Add this example in your configuration
You can directly use the following command to add this example into your configuration :
git checkout origin/example-dashboard-collections-with-form .